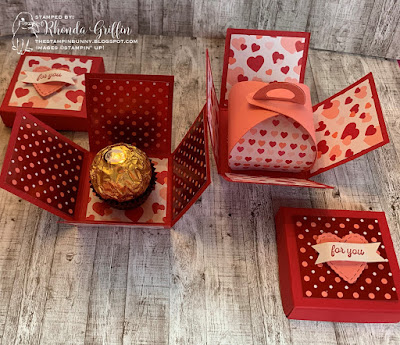
These little explosion boxes aren't new, but I enjoy this smaller size, 2 inches by 2 inches. It easily holds a Mini Curvy Keepsake box, a battery powered tealight, or a golden Ferrero Rocher candy.
In the past 12X12 cardstock was used, and they were 3X3 squares which required a much larger commitment of designer series paper. Often a 3 tiered cake or baby shoes might also be placed in the center of the bottom of the box.
For the tops of the boxes I used the small stitched, scalloped heart from the Stitched Be Mine dies in the annual catalog, and I made the little dovetailed "for you" tags with the Classic Label Punch (How to can be found in the video.) There are so many ways you could decorate these little boxes!
Dimensions:
Box Base: Cardstock is a 6"X6" square. Score at 2" and 4". Then turn 90 degrees and Score at 2" and 4" again. Cut off each corner square as shown in the video and fold.
Top: Card stock is 1-1/8" square. Score at 1/2" inch on each of the four sides. Cut only one side of each corner square in only one direction as shown in the video. Fold and add Tear and Tape adhesive to each square to create the box top as shown in the video.
Add a 1-3/4" square of designer series paper to each inner and outer square and to the top
and the inside bottom if you'd like. Embellish as much or as little as you like!
Product List
Thanks for hopping by and reading!

Receive my weekly customer newsletter:

Shop anytime on my Stampin' Up! website:

and Earn Bunny Money Rewards!
Tempting sale items:

Free Tutorials:

Join My Team:


No comments:
Post a Comment