Showing posts with label Home Decor. Show all posts

Sunday, December 29, 2019

Water Lily Impressions Lily Pad Stampin' Up! Calendar 2020


This design has been around for a while, but I haven't used it yet, so I thought it would be fun for our desk calendars in class for this year! The calendar uses the Sale-A-Bration Lily Pad Dies, Lovely Lily Pad stamp set, and Lily Impressions Designer Series Paper. I created a video to show you exactly how I made it as well.

Flirty Flamingo Cardstock 4-1/4" X 11". Score at 4-1/4, 8-1/2, 9-1/2 and 10-1/2 for the base. Flirty Flamingo Cardstock 4-1/4" X 5-1/2". Score 5-1/2" side at 2-1/2" and 3". Score 4-1/4" side at 1/2" and 3-3/4" for the Post It box if desired. If you'd like to mail the calendar, omit the box and use a 3-1/4" X 2-1/2" layer of cardstock. Designer Series Paper layer is 4" by 4" square.


If you need any of these Items, I'm happy to help. The Lily Pad items are all Sale-A-Bration choices at $100 for the dies and $50 for the stamp set and designer series paper.

Customers earn a FREE product every time they reach a threshold in increments of $50 in the US. If you spend $50, you'll receive a free level 1 item. If a customer spends $150 usd, they can then choose three level 1 items or one level 1 and one level 2. 

Product List


Thanks for hopping by and reading!

Receive my weekly customer newsletter:

Shop anytime on my Stampin' Up! website:

and Earn Bunny Money Rewards!
Tempting sale items:

Free Tutorials:

Join My Team:

Sunday, September 29, 2019

Fall Autumn Sponged Leaves for Branch Table Centerpiece

I replaced my magnolias from summer (like the Magnolias on the front of the 2019-2020 Annual Catalog) with leaves for fall.  Just some hot glue and quickly stamped and sponged leaves...Easy Peasy!!


This Quick as a Bunny video shows sponging the Crushed Curry leaves for more fall color.


Thanks for hopping by and reading!


Receive my weekly customer newsletter:


Shop anytime on my Stampin' Up! website:

and Earn Bunny Money Rewards!


Tempting sale items:


Free Tutorials:


Join My Team:

Tuesday, April 24, 2018

New Stampin' Up! Statement of My Heart Frame

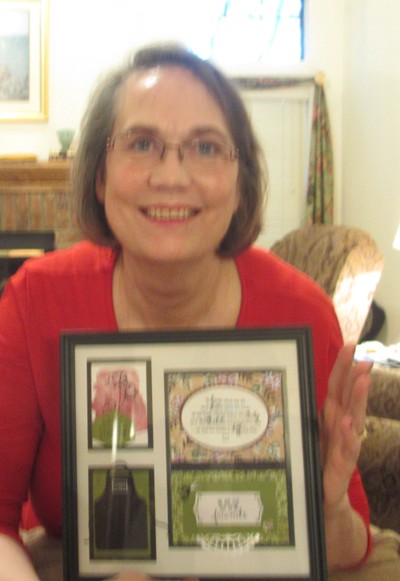
Last night was our Bi-Monthly Team Meeting, and I wanted to provide something for the girls to create with the new items that are available for pre-order.  I found these frames (with the matte) at Dollar Tree for, obviously, $1, and I think they look way more expensive than that when filled with the new Stampin' Up! Share What You Love stamps and Designer Series Paper.  I let them choose their colors but had many of the components ready to go for quick assembly since we had lasagna to eat as well.


It was fun to see the choices they made to make the frames their own! I only wish my camera battery had not been dying...Apologies to everyone for the blurry (due to lack of flash to avoid glass glare) pictures!

Kris Kilkenny-- Kris used the new Grapefruit Grove as her focus color.

Carolyn Wagner-Bark -- Carolyn used Old Olive and the Rich Razzleberry and Crumb Cake floral.

Leslie Parks -- Leslie used prints with white backgrounds and "flipped the sketch".

Lynda Adcock -- I love the way Lynda tilted the apron on its side..Too cute!

Valerie Aguirre -- Valerie used Old Olive and the Mint Macaron Pearlized floral.


Product List


Friday, September 8, 2017

Inking Autumn Inky Friends 2017 Blog Hop Spooky Night


Welcome to the Inky Friends' Inking Autumn Blog Hop! Join us as we show you our favorites from the Fall offerings in the Stampin' Up! Holiday Catalog. Should you get lost and need to see a list of participants, just click on the Inky Friends Blog.

You've likely arrived from Betty's KittyStamp Blog in which she focused the Spooky Cat Bundle.

I'm focusing on the Spooky Night Designer Series Paper for the hop.  There are so many ways to use it other than as scrapbook paper.  It is SO useful!

I love that the multiple image trees in the Spooky Night Designer Series Paper fit nicely on the Pizza Boxes with just one layer of Basic Black Cardstock, but I didn't want to color the Pizza box with anything. Since it is white and the paper is Very Vanilla based, I stamped the Owl-oween owl onto Whisper White Cardstock and trimmed around it.  Then, the White and Basic Black wired edge ribbon also matched in my mind. :) What will you put inside the tiny pizza box-a cookie? 

A Moon Pie fits perfectly inside....and I think they are spooky/funny to give at Halloween.

Now if you aren't planning to make a bunch of Pizza boxes or treats with the paper, you may wonder what to do with the remainder of the Tree print? Luckily it is a nice, small stripe on black that I used for three of the test tube holders below. It is nice that the Pumpkin pattern has both Jack O'Lanterns and regular pumpkins so you may use just pumpkins on a fall project. 

I love the test tube holders popularized by Lisa Somerville several years ago. This paper has such variety and options that you almost don't need the stamp set, but I really wanted to use the beakers of potion in some nice bright colors, so you can see that below as well.

I filled a little jar from the dollar store with Candy Corn and Pumpkins and added a belly band of Designer Series Paper as well as a tie of the Black Vintage Crochet Trim.  The Spooky-licious image is from the The Little Things set which I used since it wasn't chosen for this hop or our Christmas hop (which is coming up in a few weeks).  It is quick and cute on a Moon Pie which are my little gifts with purchase for this month for my customers.


Now it is time to continue to Sharleen's Stamp with Shar Blog to see her designs with the Quilted Christmas bundle.