Wednesday, November 25, 2015

Gold Embossed All Ye Faithful OPEN CRISS CROSS Card

Recently, I made this gold-embossed Open Criss Cross card that lays flat in an envelope. By tucking the right side under the center image, I created a little stand up decoration. This was inspired by an open Criss Cross card on Pinterest (By "open" I mean it doesn't have a belly band.) by Linda Bauwin.


Tuesday, November 24, 2015

Simple Delicate Ornament Christmas Card

Sometimes you are feeling lazy, and this set is perfect for that!  I just used the Delicate Ornament Thinlits Die with the pretty Holiday Fancy Foil Designer Vellum and Red Foil Sheets for a Simple but shiny Quick Card.


Wednesday, November 11, 2015

Off Set Gatefold Poinsettia Card

This card which we made at Class last week is in style a CASE of page 18 of the Stampin' Up! Holiday Catalog. I LOVE the offset gatefold design of that card, so I just had to make one. I used the more intricate of the curvy corner punch edges and filled the slot/ribbon slide punch with larger ribbon. Of course the colors and sentiments are different as well. I had to line the inside with a Very Vanilla layer that was larger than usual so that it would look pretty under the punched corners. That layer is 5-7/8" by 4-1/8".


Monday, November 2, 2015

Join me this Saturday for this year's Craft Show!

Craft Fair - 2015!

Saturday, November 7th
9:00 a.m. – 3:00 p.m.

Quail Springs United Methodist Church

North of Quail Springs Mall at
14617 N. Pennsylvania Ave.


Large Variety of Vendors
Two Buildings – Fifty Vendors
and a Gift Boutique

Lunch  Available


Get holiday decorating items and gifts!

Friday, September 25, 2015

Stampin' Addicts 2015 Stampin' Up! Winter Holiday catalog Blog Hop Cozy Christmas & Home for Christmas DSP


Hi, once again, stampin' enthusiasts!  I'm so glad you could join us as we hop through the Winter themed stamps in the Stampin' Up! Holiday Catalog.  If you are hopping in order, you may have arrived from Sara's Lily's Ink Pad Blog where she showcased the Project Life Seasonal SnapShot. Lovely cards and pages!!  Should you get lost or have questions, you are welcome to click through to the Stampin' Addicts Chat Thread.

I'm using the Cozy Christmas Stamp Set and Home for Christmas DSP for my projects today.  

"A Visit from St. Nicholas" definitely came to my mind for this card....."The moon on the crest of the new fallen snow, Gave the luster of mid-day to objects below;"  (Attr: Clement C. Moore--Modern word choice.) 

I hope you can see the sparkly Dazzling Details added to the trees, the horizon and house edges.  This card was surprisingly quick to make and involved using marker to stamp for the house and trees, cutting out those images and tearing to each edge of the white paper for the snow. The moon is White Craft Ink dried with a heat tool, and the Sleigh is stamped in Basic Black Archival ink. I also stamped the sentiment, "May the Magic of the Season Fill Your Heart and Home" on the inside. It think it fits with these two images especially well.


I made this card when I first received my New Catalog order, but I've seen several similar ones since; so it isn't first on the web, but here it is.  I love the images in the Home for Christmas Designer Series Paper....They are so vintage and cutesy!  I also love the idea of looking in on Santa as he begins his work around the tree. :)

I like the idea of these retro images on tags too... I don't use brown kraft paper to wrap, so I find I need to use very few colors on my tags so they'll match my paper. They are simple and quick, and I could easily mass produce them.  Am I kidding "quick" with the cutting?  Nope, I find school pick up lines to be a great time for cutting out these little shapes.


Now, it is time to journey to Twila's Stamp A Little Longer Blog to see what cute things she's made with the Happy Scenes & framelits.... I love the curtains and wide range of her designs!!


Monday, August 31, 2015

Howl-O-ween Treat Witchy Owl Easel Card

Our Easel of the month for September will use the Howl-O-ween Treat set with the whimsical owl. This little witch has a bit more depth than it appears in the photo.  It is so easy to pop up different pieces with the Boo To You Framelits.  I especially liked using Black and Gold Glimmer paper for the wand.  I used the Curvy Corner Trio Punch for a slightly different shaped Easel.  We'll use each of the Happy Haunting Designer Washi Tapes though I cut the edge off of the Rich Razzleberry tape for a more pleasing design to my eye.


Friday, August 28, 2015

Stampin' Addicts 2015 Fall Stampin' Up! Holiday Catalog Blog Hop


Hi again friends! You are welcome to join us as we hop through the fall themed items in the new Stampin' Up! Holiday Catalog.  I loved the catalog this year! Should you get lost or need to see a list, here is the chat thread on Stampin' Addicts.

I know you enjoyed seeing Paula's beautifully detailed creations with the Witch's Night stamp set on Stampin' With Paula. Such fun designs!

I'm showing the Among the Branches set this time. It has a lot of possibility, and I've really enjoyed using it.

First is this Square Pillow box embossed with the Woodland textured embossing folder.  I think this would be a fun holder for a hostess gift at Thanksgiving or for favors on each person's plate.  I just added the Into the Woods Rich Razzleberry Ribbon and the Into the Woods Elements after stamping the Very Vanilla and adding a bit of Chocolate Chip to the tree trunks.

Next, I wanted to try a Halloween card with an unusual color scheme.  Well, this ~really~ is different. I also think the yellow eyes are super creepy.


Then, I used the MOJO Monday sketch for this week, (MOJO 412) and cut down a spider web doily to a size I preferred by taking out the middle and overlapping the edges. (It was also necessary to fold the web before each fleur de lis point.) I love the effect that creates because the web doesn't stick flat...it is more wispy.  There are 1/2 glue dots under each fleur de lis point. I colored three Jack O'Lanterns in the Happy Haunting Designer Series Paper for added spookiness. :)  A few rhinestone bling add a fun sparkle.


Now, it is time to hop over to Twila's Stamp A Little Longer blog to see her creations with the A Little Something set. Have fun, and we hope to see you on September 25 for the Winter Holiday Catalog Hop!


Thursday, August 27, 2015

Happy Scenes Hearth and Home card


I'm going to use this card as one of my Alternative Christmas cards for my church. The charity I create cards for is Edmond Mobile Meals, so I thought this fit well with that idea.  It was nice anc quick to make the snowy scene by just stamping twice and cutting along the horizon.  Then I added a little snow to the trees. I did cut out the cars, but they are easy since there are several nice straight lines. 

The Boughs and Berries Embossing Folder is slightly longer than we are accustomed, but it made a nice spot in which to put the greeting at the bottom on this regular 4.25" X 5.5" card.  


Tuesday, August 25, 2015

Cherry on Top Designer Series Paper Stack Treat Bag

For class this month, we made treat bags using that die and the Cherry on Top Designer Series Paper Stack.  I think it was a quick and cute project, and I usually don't just clothes pin things to hold them onto the main layer, so I tried a little weirdness there.  I imagine a ton of possibilities for these treat bags....gift card holders, goodie bags or envelopes for cards....LOTS of choices.


Monday, August 24, 2015

Sunflower Easel Card

This Fall Easel card is a combination of the hardwood background made into a fence with my attempt at a Sunflower with the petal from the Flower Fair Framelits.  We always make cards for others, but I made this one for my desk at my part time job. :)  You could use another sentiment of course. If you need a Get Well card, I think "Happy Healing" would look great.


Sunday, August 23, 2015

Bleached Blossom

I was inspired by a lovely swap card I received from Stampin Up!'s convention. It was Cherry Cobbler bleached to Very Vanilla, but it didn't have marker added. It was very pretty...Thank you unknown fellow demo!

I really like the way Marina Mist bleaches to a pinkish white that looks nice with Pink Pirouette cardstock.  I actually used a Blushing Bride marker to add more color to the blossom, but I think it blends nicely.


Saturday, July 25, 2015

What I'm Swapping....Envelope Punch Board Orbit Brand Gum Holder Tutorial


I made this Orbit Brand Gum Holder with the English Garden Designer Series Paper.  When you finish the gum, it is easy to just slide a new pack of gum into the holder-easy peasy!

Envelope Punchboard Orbit Brand Gum Holder
English Garden DSP and Bold Butterfly and Butterflies Thinlits
CS –Mint Macaron, Night of Navy
Acc.-Basic Rhinestones, Dimensionals, Delightful Dijon In Color Blossom Accents, Tear and Tape Adhesive

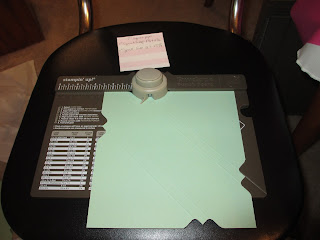
Cut a 7 inch square of cardstock.

Punch and score the first side of the cardstock at 1-7/8” and 2-1/2”.  Skip a Side and Punch and score the opposite side at 1-7/8 and 2-1/2.

Punch and score the second set of opposite sides at 3” and 3-5/8”. 

Then, flip the cardstock over and only punch (not score) at the same intervals. You really just have to look to see what you're doing. You just want them to “match up”.


When you've finished using the envelope punch board, it should look like this:


In this picture, you can see the gum package (with the top flap cut away).  It is the size of the middle rectangle.

Next, cut the jagged parts off with scissors until it looks like the picture below:

Then, with the points at 3 inches cut the points off of the long sides.  This makes each flap/side 1-1/2 inches.


Now, the opposite side:

Fold your score lines, and use Tear and Tape Adhesive to Secure your side flaps (just put tape on the bottom sides below the midline-NOT on the top).  Do not attach it to your gum so that you will be able to slide the gum package out. That way you can replace the gum package when it is empty.

After putting adhesive on only the bottom halves of each side flap. Fold the Bottom Flap up, then fold the right side over, and then fold the left side over taking care to "square" the corners of the box. (I had the gum package in the box at this point to assist me in achieving that.)


Cut a piece of designer series paper (Mine is 3-1/4 inches wide by 3-5/8 inches wrapping from the front over the top and to the back.) Score on horizontal at 1-1/4" and 1-3/4".

Next corner round your top flap using the top of the Envelope Punch Board.  Also, corner round your designer series paper piece.  Next place adhesive in the fold and along each horizontal edge of your designer series paper piece. Begin in the middle (on the top fold/edge) and adhere the dsp to the box.

Add your butterfly by using dimensionals on only the bottom two quadrants of the butterfly's wings. This allows the flap to "tuck into" the space under the butterfly.  Next, I used a glue dot to adhere an In Color Blossom Accent. I added a rhinestone bling to the center of that Delightful Dijon flower and added rhinestones to the butterfly's body as well.