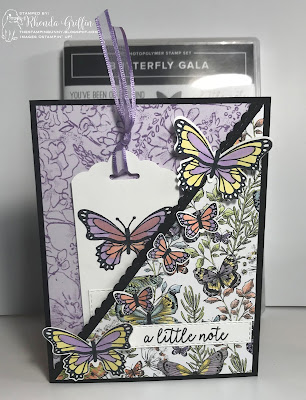
One Sheet Wonder Cards are a wonder-ful way to use (rather than hoard forever) the wonder-ful papers we earned from Sale-A-Bration this year. The Botanical Butterfly and Painted Seasons papers have gorgeous designs that perfect for showcasing in One Sheet Wonder style cards.
This template above is not meant to be printed and cut along the lines. The measurements are correct, but the proportion may not be.
Why 8-1/2" X 11" instead of 12" X 12"? When making "custom" designer series paper using stamps, it is easier to use 8-1/2" X 11", and I find the pieces this size template creates easier to manage. I'm lazy like that! :D Other the next few days, I'll you several patterns of paper for these cards, but typically one makes an entire set of these cards in one pattern. When a stamper uses only one pattern for all seven cards, it is perfect to put in a clear bag or cute box as a small gift for someone.
To begin, make your quadrants which aren't exactly the same size.
1. Cut vertically at 4".
2. Cut horizonatally at 5-1/4".
Now, you will have 4 rectangles/quadrants.
2. Cut horizonatally at 5-1/4".
Now, you will have 4 rectangles/quadrants.
3. Cut the top left 4 X 5-1/4 inch quadrant on the diagonal.
This first card addresses the top left quadrant. If you'd like to make a card as shown in the Painted Seasons Coral Floral card, you'd need to cut two of the quadrants on the diagonal. You could select your least favorite of the other design quadrants and just not use it.
This card shows that you can use both sides of double-sided paper. The other side of this floral paper is polka dots and would also make a lovely card! (The Highland Heather piece is a full sheet of 5-1/4" X 4". It could also just be cardstock in a matching color.)
This photo shoes that I lined up the scalloped edge and ran it through the Big Shot twice to make it longer. I then attached it to the back of the floral with the white background. I then used Tear and Tape on just the bottom and side to create a little pocket when adhered onto the Highland Heather layer of course.
Thanks for hopping by and reading!

Receive my weekly customer newsletter:

Shop anytime on my Stampin' Up! website:

and Earn Bunny Money Rewards!
Tempting sale items:

Free Tutorials:

Join My Team:


No comments:
Post a Comment