Monday, March 28, 2011

Petal Cone and Marigold

My downline Kris Kilkenny convinced me to make a marigold (that have been popular for months-I just never jumped on the bandwagon) for the top of this simple and sweet Petal Cone favor we'll make at class this Thursday. They are perfect for giving earrings, and last week Emma gave a gift of tiny nailpolishes and a gift card using it as her wrapper.


Tuesday, March 22, 2011

Z fold Top Note Stamp A Stack Card

This card is a Z fold with a die cut from the Top Note Die on top stamped with the Nature Walk set.  I'm definitely going to try this color combination again (probably on a more complicated card). It is pleasing to my eye :).

It is today's Fourth Tuesday Fun Fold on Stampin' Addicts.  It is a very simple premise if you'd like to make one too:

Cut your cardstock in half longways at 4-1/4 inches.
Score at 5-1/2" and 2-3/4" again longways (of course).
Fold.
Embellish as desired.
This is the first of the options for Stamp A Stack (16 cards for $22) on April 6th at 10:00 a.m. and April 7th at 6:30 p.m.


Monday, March 14, 2011

MOJO182 Beveled Windowpane

This is a little outside of my normal style, but I don't mind it.  It is fun to use some different colors and textures sometimes. I used the MOJO Monday sketch 182 which worked great with the beveled window and I found the color scheme from a catalog. The black definitely makes the other three colors pop!


Saturday, March 5, 2011

Bunny Hop...Operation Write Home Blog Hop


Welcome to the Operation Write Home Bunny Hop blog tour!  I know you've enjoyed your stop with Paula and her cheerful card! You may click through 125 stops and see a variety of Spring and bunny-themed cards. I encourage you to click the underlined link and visit Operation Write Home for information about the charity's endeavors to provide blank cards for our troops to send home to their families.  (OWH also accepts cards written TO our troops for distribution thanking them for their service. These are called Any Hero cards.) The link contains a full list of hoppin' blogs so that you can continue past a dead space in the hop that doesn't have a post for today.

Since my blog is titled, The Stampin' Bunny, of course I thought the Bunny Hop would be fun to join since I enjoy making cards for Operation Write Home with my church women's group. I also send retired swap cardfronts to OWH after turning them into full cards after the Stampin' Up! retirement list is announced each year.

I wanted to use my favorite Stampin' Up! bunny....from the set "The Nicest Things". I used a Spring Greens color combination that now reminds me of St. Patrick's Day especially with the terra cotta colored pot and the little girl's red hair. For the layout of my card, I used Stampin' Addicts Sketch Challenge #85 (SASC85).
The deadline to send Easter cards is March 18th and the deadline for Mother's Day cards is March 31st, so you still have plenty of time to create cards the troops can use to send wishes to their moms.  There are some things to be aware of if you donate cards....For example, glitter is not to be used, and there are three different places/ladies to which you can mail your card donations (It is best to chose the one closest to you.).  Here is a link to helpful hints on the OWH blog: Guidelines

Now, please continue hopping to the NEXT STOP, Linda's blog at http://stamperstouch.blogspot.com/ to see her beautifully designed and colored Easter Eggstravaganza. Thanks for visiting!


Wednesday, March 2, 2011

Selective Baby Wipe Inkpad

First, I put a piece of transparency on top of the stamp, right side up.

Next, I put drops of reinker (I used some Pretty in Pink and Bashful Blue in addition to Perfect Plum.) only on spots that have flowers on the stamp.

In the same way, I added some Old Olive randomly around the stamp to add highlights. (no photo)

Then, I placed the acetate VERY gently (don't tip or shake) into the bottom of a clam shell box. (I cut off the lid of an old box to use for this so that it isn't at all top heavy or in the way.)

 Next, add Baby Wipes on top of the inked transparency sheet. I added a little more ink on top of each spot afterwards but not too much.


Then, I inked the stamp really well with the River Rock inkpad.
Next, I removed some of the ink from the flowers with a Q-Tip, and pressed the stamp onto the baby wipe inkpad carefully lining up the top, bottom and flowers by sight.  Don't press too hard or too long or all of your River Rock ink will absorb into the baby wipes.

Finally, I stamped the image onto cardstock. This will be a watery, hazey image, so be prepared if you try it.


Tuesday, March 1, 2011

Rolling Marble Background Technique Plane & Simple

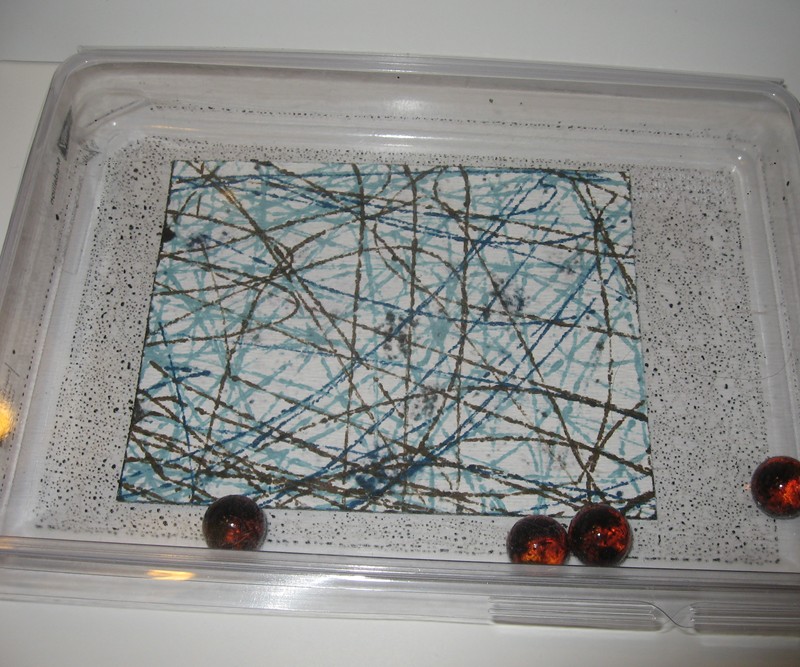
First, I found marbles that I don't mind getting messy or potentially ruining. I squirted several drops of reinker in the clam shell box and rolled the marbles to get them thoroughly coated.  At this point you could clean the center of the open area to remove some of the ink so that it won't get on your card.

Rolling the Not Quite Navy to disperse the ink onto the marbles:

Baja Breeze Ready to Roll....

 Next, place your cardstock of choice into the clam shell, snap the lid shut and roll the marbles over the cardstock. You can go in a direction such as side to side, top to bottom or diagonal or you can swirl the marble into circular waves on top of the cardstock.

Soft Suede:
 This picture shows the result on Glossy Cardstock with swirling:
 This picture below shows a little too much rolling on the left and too much ink under the cardstock before rolling on the right (It seeped through the cardstock).
 This picture shows a contrast between Whisper White and Very Vanilla (top) carstocks.
It occurred to me that this would make an awesome masculine graduation card while I was working on this....anyway....here is my finished card:

Monday, February 28, 2011

Baby Wipe Butterfly (Clear block with Baby Wipe Inkpad Technique)

This is so easy you'll be surprised I bothered with a tutorial!
First I inked the baby wipe with reinkers (Pear Pizzazz, Not Quite Navy and Baja Breeze in this example).
Next, I inked a clear block (as one does when clear block stamping), and after insuring it was inked well all over, stamped it onto Very Vanilla cardstock. The wetness of the baby wipes gives it a much more mottled/tortoise shell type look than one gets with a regular ink pad.

Then, I let it dry for about 15 minutes.

Next, I used the Big Shot and the Butterfly Bigz Die to die cut the butterfly.
On this card, I sprayed the butterfly with a mist of alchohol and shimmer paint for a little glimmer as well.
Finished card:


Friday, February 25, 2011

Stampin' Addicts Birthday Bash Blog Hop 2011 Baby Wipe Inkpad


Welcome Stamping Friends to the Stampin' Addicts Birthday Techniques Blog Hop!

Our Birthday Hop this year features birthday cards again, but this time with a variety of fun techniques for you to enjoy. 

You may have arrived from Jennifer's Blog, Stampin' On the Fly, where you enjoyed the Clear Block Stamping technique on her lovely projects. Should you get lost or want to chat about the blog hop, visit the Blog Hop Chat Thread on Stampin' Addicts for a list of all the participating blogs in order.

I'm featuring the Baby Wipe Inkpad Technique in which you put several colors of reinker onto baby wipes to create a multicolored "inkpad" to use for stamping solid image stamps.

This card probably doesn't look like a Baby Wipe Inkpad card.....Perhaps a marker to stamp or Poppin' Pastels?  I added Perfect Plum, Pretty in Pink, Bashful Blue, River Rock and Old Olive to certain areas of the Baby Wipe Inkpad to create this image and give it a watery look. A little old school sponging and a few of the great SU! colored brads in Soft Suede and Perfect Plum keep the ribbon from being the focal point of the card and allow your eye to take in the main image. Check back for a mini-tutorial on this idea on Wednesday.

 For this card I used a clear block to stamp onto a Pear Pizzazz, Not Quite Navy and Baja Breeze Baby Wipe Inkpad which created almost a tortoise shell or crackle look. I spritzed it with an alcohol mist made with Stampin' Up!'s Frosted White Shimmer Paint after cutting out the butterfly shape using the Big Shot. I curled the wings a bit for interest. This card features Mojo Monday Sketch #178 (MOJO178).  The Happy Birthday image from the Create a Cupcake Set has a whimsical yet elegant look that I think matches the mood of this card, but it is so versatile that it really goes with anything.  Check back for a mini-tutorial with pictures of the process of making this card on Monday.

And now for the typical look of a Baby Wipe Inkpad card....I used the Build a Blossom set and punch with
So Saffron, Pretty in Pink and Melon Mambo for a tropical hibiscus on this birthday card.  I had a happy accident when I stamped the petals for this card. I caught a spot in the middle of the stamp with ink (due to the thickness of the baby wipes) and stamped it onto my card as well. I think the added color in the middle of an open space that would have been white on my example worked out perfectly!  The leaves on this card would still fit in a regular medium SU! envelope because it is a 4-1/2 X 4-1/2 inch card.

Now click on over to Tanya's Tinkerin' In Ink blog for a look at her fun Reverse Faux Letterpress creations! I hope you enjoy the hop!  Happy Birthday Stampin' Addicts!


Tuesday, February 22, 2011

Wrapped Present Gift Card Holder

Today's post is for the Stampin' Addicts Fun Fold Tech #5 today on Stampin' Addicts!

It is a great birthday celebration this week with a Technique focused birthday blog hop this Friday (check back to see it here of course!), so look for fun things all around the Stampin' Addicts site and join in! 
For today's Fun Fold, Vicki Burdick has graciously allowed me to feature her Wrapped Present Gift Card Holder. It is the perfect festive Birthday gift card holder and is great for celebrating for us on Stampin' Addicts! Thanks Vicki! Here is a link to Vicki's blog for a peek at her instructions in case you could use a second explanation: It's a Stamp Thing: Gift Card Holder It does not fit in an envelope, but do you really need one?
1. Cut a piece of base cardstock 4" by 8", a piece of cardstock 4-1/4" by 3" (score in the the 3 inch side at 1-1/2"/down the vertical middle), and a piece of contrasting/matching cardstock at 1" by 4".

2. Cut designer series paper to match 3-3/4" by 3-3/4 " and just under 1-1/4" by 4".

3. Cut your bow by first punching the small oval punch and then punching the large oval punch around it. I tried for a consistent top and put the extra cardstock (since they do not layer perfectly) at the base to allow for gluing. I glued them with Mono Multi in the green and white bottle and sticky strip, but for class glue dots work well.


4. Use sticky strip to close the 8"X4" base and use a gift card to position a piece of sticky strip horizontally across the card so that the gift card or cardstock attached to it doesn't fall all the way to the bottom (for me it was 3/4 of an inch from the edge).

5. Punch part of a circle using the 1-1/4 circle punch at the top of the base, line up your dsp layer and punch it as well. Then glue your dsp to your base and then your contrasting 1X4" layer. Punch your contrasting 1X4" layer to match
6. Fold your "lid" and adhere the dsp to the front. Make your embellishment for the front and put the "bow" behind it.

7. Attach velcro to the flap putting the "pokey" side on the card and the "fluffy" side on the flap for ease of use. If you have adhesive velcro, I wouldn't trust it--I used a dot of Mono Multi green top glue.
Wednesday, February 16, 2011

Quick Cards with the Sale-A-Bration Ice Cream Parlor Pack

I enjoy the bright colors and fun accents of this Designer Series Paper and Quick Accent Set.  They are great for scrapbooking, but also for making quick cards. For Quick Class this Thursday, my customers will be able to choose use the quick accents of their choice to make a card in record time.

Tuesday, February 15, 2011

Asian Inspired Thinking of You

The new level one hostess set, A Slice of Life, in the Occasions mini catalog is quite a useful one!  I enjoyed the baby onesie on a card a few weeks ago, and I enjoyed working with the dogwood blossoms today.  I used the square lattice embossing folder to create a nice texture on the Early Espresso cardstock layer, and I think this card's color scheme contributes to the simple modern look too. When coloring the blossoms, I used the tiny end of the Blushing Bride marker to quickly make a loop of color so that there is still some white on the petals.  I enjoy the knots in the hemp twine too.


Monday, February 14, 2011

Happy Valentine's Day!

Today I thought I'd show you the Valentine lollipop decorations my daughter made for her classmates.  The penguin was made using the Owl punch. I've not been able to determine the first creator of the penguin from owl punch, but it certainly wasn't me!  We thought the round background and torn snowy edge looked nice too. Hope you have a great day!


Monday, January 31, 2011

Operation Write Home

I enjoy using rather than tossing my cardfront swaps after they retire.  I can only use so many of certain types of cards, so I attach them to a white or ivory cardbase and donate them to Operation Write Home.  The charity sends a box of cards to a contact who distributes the cards among their military unit/group for the hero to send a card home to a friend or family member.  Cards written TO a hero are also included so that those who don't normally receive mail get one as well, but the main focus is cards for the heroes to send home.

This year I had some retired cardfronts, but what I really needed to use was retired carstock from Stampin' Up!'s last color renovation.  I was able to use some Western images (both current and retired) and the Motorcycle from last year's Summer Mini Catalog for Father's Day cards and the Manhattan Flower Rose embossing folder to create Mother's Day cards.  I had help in making the Rose cards and Motorcycle cards from my church women's group and from my stamper friends who helped after class one day.  My daughter Emma helped with the Western cards as well. All in all it is an enjoyable and easy way for me to clean up my craft area without being wasteful, and all together Operation Write Home received 192 cards.

If you'd like to read more about Operation Write Home, here is a link to their website: http://operationwritehome.org/


Friday, January 28, 2011

Stampin' Addicts Sale-A-Bration Blog Hop 2011


Welcome Stamping Friends to the Stampin' Addicts Sale-A-Bration Blog Hop! 

This is the first stop on our trip, but you may have arrived from Cheryl's Blog, Love to Stamp and Scrap, where you enjoyed her lovely creations with Thank You Kindly. Should you get lost or want to chat about the blog hop, visit the Blog Hop Chat Thread on Stampin' Addicts for a list of all the participating blogs in order.

I really enjoy the So Happy for You Sale-A-Bration set...Five great sentiments plus 5 adorable mini stamps that make for an easy quick card! This set is a good one to have on hand, for making a variety set of cards to give as a gift or for creating a card kit of stamped cards and separate sentiment labels that can be added when the occasion arises.  The red card sketch is Paula's Stampin' Addicts Sketch Challenge #60.
The Emboss Resist Masking card below uses each image in light colors that are perfect for a spring birthday...Using a different color circle sponging on each image makes them really pop.  This card is my sample for both this week's Fun Fold Technique on Stampin' Addicts and for next week's Technique challenge to use both Emboss Resist and Masking in some way.  Stop by and check out any of the challenges!
It doesn't have to be about the sentiments though....sometimes it's all about the bling!  Contrary to the vintage chic design usually applied for the petal cones, I added random large and medium rhinestones (with Mono Multi glue for a secure hold) as well as small rhinestones in the center of each stamped flower and on the butterfly for a sparkly modern look. The Petal Cone is a perfect box for a gift of earrings or trinkets, and this set of colors would be adorable in a girl's room.

Finally, this set is great when its sentiments are combined with other sets such as the baby sleeper from the A Slice of Life Hostess Level 1 set in the Occasions Mini Catalog.  I used the Mojo Monday Sketch 175 ( MOJO175 ) for this card, and I enjoy the substitution of a safety pin for the hatpin and addition of the mini button brads at the bottom right. Adding a couple of embossed texture layers made this card quick yet interesting.

Now click on over to stop number two, Jennifer's Sunflower Stamper blog for a look at her pretty and fun ideas for the Punch Bunch Sale-A-Bration set!  I hope you enjoy the hop!