Saturday, August 29, 2009

Holy Family

Welcome to the Stampin' Addicts Happy Holidays Blog Hop! Our Hop will feature sneak peaks of the different stamp sets and accessories the Holiday Mini Catalog has to offer. There are 40 jam packed pages of the Holiday Mini Catalog that will fill many of your holiday stamping and gift-giving needs! Be sure to visit the Stampin' Addicts gallery and forums for great Stampin' Up! ideas!

If you have been following the blog hop in order you've just seen Dawnmarie's wonderful Berry Christmas creations at DM Dezigns.

Just sit back and imagine a few of the things you might make with the Holy Family stamp set as you see what I have for you here. :) I took several pictures, while I was creating, of both the candle and the card shade, so look for tutorials next week if you are interested.

First, I wanted to create a home decor item, but a Nativity scene limits the possibilities just a bit. My downline Kris suggested a candle, and candles are one of my favorite quick and easy projects. I merely embossed on white tissue paper, turned the gold embossing powder toward the candle and melded the paper into the candle. (Turning the gold embossing powder toward the candle created the reversed image you see.)

I had already decided to create the home decor/card combo creation below which is also candle-centered. The "front" of the card has a gatefold appearance and is tied by gold cord. The Real Red sentiment panel is mounted on vellum edged in gold-embossing. The "gates" allow the card to stand on its own.

The "back" of the card has a top note-sized hole with the gold embossed image on vellum. I edged the Real Red image frame in gold embossing powder by using the Versamarker and added three gold brads. The star is cut out and attached with a mini glue dot. I apologize for the poor/fuzzy picture quality...I wanted the candle glow to shine. Safety first...be sure to allow proper distance between your shade and votive candle holder.


This last picture is of three regular cards using different image treatments. I wanted the card on the left to be easy to duplicate so the image is stamped in Chocolate Chip ink on Vanilla. I used the Big Shot Join in the Cheer die for the word JOY.

The center image is stamped in StazOn ink on our watercolor paper and watercolored using classic inks and an aquapainter. I used the sentiment from Christmas Cardinal to create a simple card.

The card on the right has a base of Very Vanilla cardstock cut with the Big Shot Scallop Square die. The image and the Merry Christmas from the Teeny Tiny Wishes set are gold-embossed and layered with gold cardstock for a design that looks a bit more elegant. These cards are in the Stampin' Addicts gallery individually.

Please continue to Kat's Kards to see what gorgeous things she's done with the Delightful Decorations set and Punch.

For your added convenience we have added directional arrows to help you find the previous or next blog spots.


Friday, August 28, 2009

Halloween Week Day 5

For today's Halloween post, I CASE'd this beautiful card by Holly Krautkremer/catrules on Stampin' Addicts. I think the brocade background image is so similar to the spooky one in From the Crypt that it just lends itself to tweaking :). I used the spider as the "stamped off"/more subdued image in the background where Holly had used the Brocade background. Stamping off is nice because it achieves a lighter saturation when using Versamark. You can of course use it with colors as well such as in generational or shadow stamping.

A few words about CASEing..... (copy and steal everything) If you're stuck for an idea, using something about another's card can be a great Mojo magnifier. :) Sometimes the color or layout can be just the thing to get your mind going in a totally different direction. This card is SO close to the original that it is almost an exact CASE, though an exact CASE would just be a copy. A CASE like this one shows that often just changing the stamp set on a card you have in your possession will make it easy for you to create a fun card quickly. When uploading your CASE'd card online, a shout out to the creator and a link to the creator's blog or online gallery is polite and recommended.

Be sure to stop by tomorrow at noon to travel the Stampin' Addicts Holiday Mini blog hop!


Thursday, August 27, 2009

Halloween Week Day 4

The new Sweet Centers Set fits nicely on the front of the Fancy Favor container with a window sheet peek-a-boo. Any number of fall candies would look sweet in the Medium Cello Baggie including candy corn, M&Ms or fall colored Hershey Kisses.. I embossed with Black Craft Ink and clear embossing powder then just added a little color with markers. The 1-3/4 inch circle punches only reaches to this point on the Fancy Favor box, so I just added a little Happy Halloween sentiment at the bottom of the box...easy peasy!


Wednesday, August 26, 2009

Halloween Week Day 3

Not exactly Stampin' Up! only--but just because we don't sell webs! :)

My friend DeNette came over to stamp today and allowed me to use her new From the Crypt set for Halloween week. I'm a lucky girl!

Of course, I started with the Cast-A-Spell designer series paper and used Perfect Plum Craft ink to stamp the skull. Iridescent Ice embossing powder gave it a spooky shimmer, and rhinestone small circle brads in Orange, Purple and Green contribute to the effect. I used glassy glaze enamel on the bat after I cut it out, and then added Halloween spider webbing from the party store for an unkempt appeal. (I bet they'd look even better on black cardstock.)


Another spooky cobwebby angle:


Tuesday, August 25, 2009

Halloween Week Day 2

I designed this Pumpkin Waterfall Card using typical Waterfall construction (SCS resources). I used the new Pumpkin Patch set from the Holiday Mini catalog as well as the Web wheel. I used the Big Shot to add swirly texture to the Perfect Plum layer too.

Each successive pull allows another Jack O'Lantern to smile at you....

Jack O'Lantern #3......

And Spooky the Spider from the Eat, Drink & Be Scary set helps wish you a Happy Fright Night!

Saturday, August 22, 2009

Halloween Week Day 1

Welcome to Halloween Week on my blog, so stop by Tuesday through Friday for Halloween fun!

Saturday-Monday will be our Stampin' Addicts Holiday Mini Blog Hop, and I'll be using the Holy Family Nativity Set, so check back once next weekend as well!

For Monday, I'm sharing this fun Potion Holder (pre-filled for you with Tang and Grape Kool-Aid). (Creator: Lisa Somerville) in advance. I'm usually not a fan of skulls, but I think it is adorable on the test tube as if it is poison. And punched out with a flower with a pumpkin one to match? Too much!

I used the Cast-A-Spell Designer Series Paper, but I admit I printed the Potion Method on the computer. We'll make projects perfect for your favorite little Trick or Treater at my upcoming class, so if you're in Edmond and interested, email me to attend! (Click the picture to see a larger pop up and read the "potion" :) )


Tuesday, August 18, 2009

Pumpkins in a Patch

The AUG09VSNF challenge was to use a scrapbook layout from the SCS scrap layout forum. I chose sketch #9 to turn into a card, and I'm pleased with the look.

I used a rather calm Perfect Plum print from the Cast-A-Spell DSP and the witch's hat from the Eat, Drink & Be Scary set with the Pumpkin Patch set. I think it is just silly enough for my daughter! :)


Tuesday, August 11, 2009

Glitter Window Penguin

I decided to use the MOJO Monday sketch today. It is MOJO99, and I love the layout! I was thrilled to use my Cold & Cuddly stamp set for the first time. I had to buy it because my oldest daughter LOVES penguins, but it is a such a cute little set too. You can't see the block of ice under the penguin's feet, but I'll have a similar card for you to see tomorrow. :) I added a Bashful Blue Merry Details Big Shot Die Cut snowflake under the white one as well, but this picture was better of the penguin, so I stuck with it. This card also has the glitter window technique which is perfect for winter cards for the technique challenge on Stampin' Addicts here: http://www.stampinaddicts.com/forums/tuesday-technique-challenges/2215-technique-challenge-21-8-11-09-glitter-window.html

1. Punch or Die Cut a hole in your TOP LAYER that is large enough to allow you to see through to your main image. (It should have a diameter that is less than your clear packing tape. My packing tape is 2 inches wide, and my circle punch was 1-3/4" wide.) Be sure to have enough room on the edges to adhere your main image underneath.

2. Make sure your main image is small enough to fit under your TOP LAYER.

3. Cover your TOP LAYER with clear packing tape on the back-tape side up.

4. Sprinkle Dazzling Diamonds glitter over the packing tape and shake off excess.

5. For maximum sparkle (though it is messy), the glitter side should be "up" and the shiny tape side should be underneath as you adhere your main image under your TOP LAYER.

I used dimensionals to attach the layers together.

Sunday, August 9, 2009

More from Friday

I also swapped this 3D matchbox emergency sewing kit on Friday:


This is a shaker card with the Shellebrate stamp set. It has sand and green and blue SU! microbeads inside.


This Fancy Favor Bag was what I brought for a doorprize. It uses the Merry Moments Designer Series Paper and had a box of the new buttons inside decorated with a Very Vanilla dyed Pretties flower.


Saturday, August 8, 2009

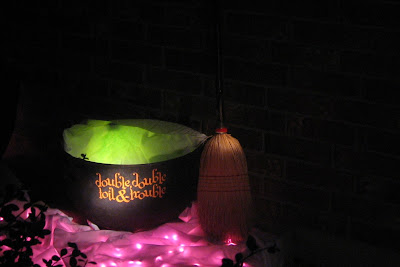
Witches' Cauldron

Today, I thought I'd show off a Halloween display I did in July for a Decor Elements photo swap.....I think it makes a creepy vignette :)

A closer view...I think I heard a witch cackle....

My secret....white pillow cases, a string of Halloween lights and a light up Jack O'Lantern. At Halloween, I'll spring for some dry ice for a better look :).


Friday, August 7, 2009

Friday's Stampin Addicts Meet & Greet

Tonight is the big Stampin' Addicts Swap Party....I'm swapping these creations:

First is an Emboss Resist Gatefold Card on which I used the Dasher Stamp with glossy cardstock and then the snowflakes from Christmas Punch on regular Card Stock. I sponged the main image with 3 pastel shades and sponged the background for the snowflakes to look like clouds.


Next is this Christmas Card using the Good Cheer set and the Scalloped Square Big Shot die. I love this new die!

I pushed the side of the card over so that just three sides of the card are scalloped for a different shape.

More from Friday's party will be posted on Sunday so check back!

Thursday, August 6, 2009

Thursday's swaps


First up are these Halloween Hershey bar sliders....A treat for your favorite little goblin! I also created a few Christmas and everyday themed sliders.

Lip balm holders were my mini gifts to some great friends of mine!


I also swapped these large medallion background tea bag holders that use the emboss resist and a new In Color.