Tuesday, January 31, 2012

Shadow Box MOJO225 "How To"

I'm afraid you'll feel silly for even looking at this post it is so simple, but here are my pictures of making the Shadow box card from the blog hop.

I used designer series paper, but I believe the box would be nicer if made of cardstock. The first thing I did was score both top and left side both at 1 inch and 2 inches. Then, because I wanted the base to be 4 by 5-1/4 inches, I scored (for the 4 inch direction) at 6, 7 and 8 inches and cut at the 8 inch score line.  Length side (tall in the photo), I scored at 7-1/4, 8-1/4 and 9-1/4 and cut at 9-1/4.
 8" X 9-1/4"

Then, I cut the corners for smoother folding. I removed the box in the outside corner (as shown at the bottom left) and the box in the middle.  See the top left corner to see my horizontal cuts at one inch. Then, you just cut out the square.

Time to fold: Gently fold each of the scored areas if you are using dsp. If you are using cardstock, you probably should use your bone folder to make neat creases. 

Fold in the short sides of the box (top and bottom -though the photo turned when uploaded).
 Now, add adhesive to the squares at each end of the long sides and tuck them in to create the box. I used sticky strip.

 Oops! Not enough sticky strip....Use a little more or maybe a glue dot to neaten this up.  To make the dividers just use a 4 inch long by 2-1/2 inch piece of dsp and score at 1/4, 1-1/4 and 2. (Or turn it around and score at 1/4 again)

Fit the dividers into the box. 

At this point I put a drop of Tombow green capped glue at the junction points of the dividers and the box to adhere it well. 

Box Top:  Cut your PeekaBoo die cuts and arrange them on the 4 X 5-1/4 "lid" top layer. I traced the openings with a pencil and punched out the holes with a square punch smaller than the holes by punching more than once.

Next, layer the top lid layer over the larger 5-1/2 X4-1/4 inch lid base and punch out the openings again. If you try to punch two layers of cardstock, you will likely ruin your punch.

Now add half width pieces of sticky strip around each window and attach the peekaboo frames.

Put more Tombow glue all over the top edge of the box base. Let it sit a couple of minutes to thicken.

 Place the top onto the base and hold it down with some objects. :)

Finished!

PeekABoo!


Pin It

Friday, January 27, 2012

Stampin' Addicts 2012 Sale-A-Bration Blog Hop


Welcome to the Stampin' Addicts Sale-A-Bration Blog Hop!

If you've arrived from Twila's Stamp a Little Longer blog, I hope you've enjoyed her lovely creations with the Sprinkled Expressions set as much as I did.  If you are lost, you can find your way on the Stampin' Addicts Sale-A-Bration Blog Hop Chat Thread  which includes the entire list of hop stops in order. Once you've perused my three projects, Lisa will be happy to have you on Add Ink and Stamp where she is featuring the Outlined Occasions set as well---bonus!

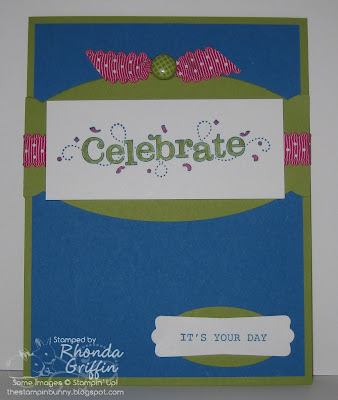
For my first card, I used the Congratulations stamp from Outlined Occasions to create a focal point that is highlighted by the new curved edgelit.  Stamped in Pacific Point with Old Olive and Melon Mambo to fill in, the Celebrate sentiment coordinates the different parts of this card. The Sale-A-Bration Kiwi brad is attached to the ribbon with a glue dot. (I cut off each end of the prongs and wrapped what was left around the ribbon.) I love these bright cheery colors with this set.

My second card is the Thanks card my church women's group sent to the troops with a box of cards.  I think it is fun with all the glisteny accents.  Silver Shimmer paper and the Cherry Cobbler glitter glue with the moonlight pearlized accent ink and three rhinestone bling make a clean and simple card shine.

Disclaimer: This card DID NOT go to Operation Write Home.  The recipients of this card are not out in the field receiving mail.  Please don't send glitter of any kind on a card to Operation Write Home because they can not control exactly who gets what card.  I didn't intend to mislead.


The next "card" uses MOJO225, the Mojo Monday sketch for this week, with the LOVE stamp.  I used the Sweet Shop designer series paper and some rhinestone bling.....

With the Peekaboo frames die. :) I really think a card with just the Love stamp and the double Peekaboo frame with the Be Mine sentiment behind it would be great for a class. I just thought of the squinkies and candy and had to try it.  I'll have a few extra pictures for you of how easy it is in my next post next week.

Thanks for visiting, and continue hopping to Lisa Youngs' Add Ink and Stamp Blog, won't you?  She has gorgeous 3D items and a super creative card!

Pin It

Tuesday, January 24, 2012

Sale-A-Brate! Good Times!

Stampin' Up!'s biggest promotion of the year has begun!

Sale-A-Bration

Jan 24 - Mar 31 All Day (Central)
For each $50 you spend, you'll earn a free item from the Sale-A-Bration brochure! Contact me if you'd like to host a workshop, book party or new Express One-Hour Workshop!  There are special hostess bonuses from Stampin' Up! when your party qualifies for benefits at $150 or at $400. 

If you sign up as a demonstrator during Sale-A-Bration, in addition to the lower $125 price, you'll receive a designer series paper ($10.95 falue) during each month you place an order in 2012!

Here's a Teabag Holder and M&M wrapper I made with the Everyday Enchantment Designer Series Paper available for you to choose when you place a $50 order (before tax and shipping).

Click here for a fun explanatory Sale-A-Bration graphic from Stampin' Up! http://www.stampinup.net/esuite/control/pagePreview?distSiteUrl=http://rhondag.stampinup.net/

I learned so much during Leadership that I am ready to share with you all!

Pin It

Monday, January 23, 2012

Back from Stampin Up!'s Leadership Conference and San Antonio Regionals

Wowie, I had a great time seeing my Stampin' friends and Stampin' Addicts sisters while enjoying the sights and tastes of the lovely city of San Antonio last week.

More than that, I enjoyed some wonderful presentations aimed at increasing my enthusiasm and business creativity as well as things to increase my Stampin' creativity.  I hope you'll see a bit of evidence of that both here on my blog and in my local classes. :)

Also, we were asked to share one of our swap cardfronts with Stampin' Up! for the creativity clothesline (my phrase).  They had clothespins for our cards, and they were so fun to view that way.  There was also a card contest, and amazingly, I was one of the winners...Believe it?

See it right there in the middle row? The Kite Spinner you made at January technique class if you attended.

Yeah, I was afraid of that. Here's a picture of my name on the list as proof...
Yes, I suppose I could have created a fake list and put my name on it, but surely with 1400 demonstrators and plenty of SU! staff, someone would have told me to knock it off, right? :) You'll just have to take my word for it I guess. Really, they ended up choosing a ~bunch~ of cards as winners, and it helped that I used an unusual set, but I was so pleased to receive the adorable Sweet Shop Designer Series Paper, stickers and brads from pages 32-35 of the Occasions Mini Catalog as the prize.
I'll continue to update this week with sights around San Antonio, fun cards and a new reward program for my awesome customers!  Thanks for checking in and Happy Sale-A-Bration!!!
Pin It

Friday, January 20, 2012

Food Friday- Save the Spaghetti!

Leftovers of things like spaghetti sauce, taco meat and chili need not be tossed just because it isn't enough for my husband's lunch the next day.  I just have a small labeled tupperware (or reused spreadable butter) container in the freezer and place the leftover in it immediately after dinner.  No more confusing random containers in the refrigerator that have to be thrown out because noone remembered to eat them!  After the container is full, I just use the frozen spaghetti sauce or taco meat the next time we want to eat it. 

When we have chili on our hotdogs we never eat it all, so there's a chili container in the freezer.  Another thing I noticed is that a recipe of Cranberry Catalina chicken (Boneless skinless chicken breasts with whole berry cranberry sauce, bottled Catalina dressing and Lipton dry French Onion soup) is enough for 8 chicken breasts, and I only need 4 (in truth 3, but my husband usually eats the other one for next day's lunch).  Half of the can of whole berry cranberry sauce goes into a labeled contained in the freezer for use another day.  Easy and both frugal and environmentally conscious. :)


Friday, January 13, 2012

Food Friday-Double the recipe and freeze one

One thing that saves a lot of time for me is to double the recipe when I make certain casseroles and put it in the freezer.  Because our family is a small family of four, I then divide the recipe into three portions.  When I serve lasagna for example, my family enjoys eating it once, but after the second time it is no longer welcome.  Creating three separate pans (8X8 aluminum pans covered with aluminum foil) of lasagna reduces the amount of leftovers significantly and insures that the last bite of lasagna is as fresh and yummy as the first (rather than refrozen after cooking or held a day in the fridge).

I use this technique with lasagna, tater tot casserole, mexican chicken casserole and mexican beef casserole.  I also divide one recipe of sweet potato casserole into two pans because unless you are expecting a lot of people, you just can't eat it all in two days.  It is wonderful to have something in the freezer in case you unexpectedly need to take food to a family in case of sickness or bereavement.

Next week: Reducing waste from chili, taco meat, spaghetti and cranberry sauce.

Friday, January 6, 2012

Food Friday-Back to Back leftover usage

It is common sense, and I should have already thought of it, but making the most of your purchases can be helpful in meal planning and in using up what you have on hand.  My online acquaintance Brie Clark mentioned back to back meal planning recently.

For example, if you know you want to have tacos on Tuesday, you'll need lettuce (usually shredded) and tomato.  You might try to have BLTs or another sandwich on either Monday or Wednesday to use up the produce.  This can apply if you are a small or large family. Large families usually buy a larger package at Sam's anyway right?

Another idea might be to roast a whole chicken on Monday and have it as the main dish. Your leftovers could then be used as topping for pizza, chicken with Alfredo sauce and pasta, chicken pot pie or a chicken soup (Mexican style, Minestrone or chicken with rice perhaps?) later in the week.

With a roast, you could eat it as is the first night. Then make beef burgundy with mushrooms and noodles the next night or have French Dip sandwiches.

Next week: Save time on time-consuming recipes.

Thursday, January 5, 2012

Ghirardelli Holder...CASE of my friend Trina Caraway

I modified Trina's cutie pie Convention Roomie gifts to me for Valentine's Day by changing the color and adding a heart from the new Take It To Heart set and the Happy Valentine's Day from Teeny Tiny Wishes.  They are so sweet and quick. You could make a ton of these! :)


Tuesday, January 3, 2012

Stampin Addicts Technique Challenge 100

The Technique Challenge on SA today is to use several sizes of the Big Shot Framelits to create a project. It is very cute to have several different sizes stacked, but the hearts especially would look great on a vertical hanging heart banner. (On my to do list)  I think one would be cute on the front door. (You could also use L-O-V-E letters on it.)


My card has a folded card base under it that also went through the big shot scalloped heart framelit so it lies neatly glued under the layered top.

Monday, January 2, 2012

LOVE Bling?


We haven't used the mini scalloped envelope for class in a while, so I was excited to use it with this little bookmark tucked inside. You could put a variety of other things inside as well. This intensely colored card is lined in red (in case you're worried about writing on the inside) and has the new Cherry Cobbler Dazzling Details on it with the Red Glimmer paper (which is a carryover item and happily, still available!). LOTS of bling and shine!

I saw the white embossed heart tag (though I used different ribbon, stamp, embossing folder and added bling) on Pinterest, and the only credit said "from etsy"-sorry whoever you are friend.