I made this Orbit Brand Gum Holder with the English Garden Designer Series Paper. When you finish the gum, it is easy to just slide a new pack of gum into the holder-easy peasy!
Envelope
Punchboard Orbit Brand Gum Holder
English
Garden DSP and Bold Butterfly and Butterflies Thinlits
CS
–Mint Macaron, Night of Navy
Acc.-Basic Rhinestones, Dimensionals, Delightful Dijon
In Color Blossom Accents, Tear and Tape Adhesive
Cut
a 7 inch square of cardstock.
Punch
and score the first side of the cardstock at 1-7/8” and 2-1/2”. Skip a Side and Punch and score the opposite
side at 1-7/8 and 2-1/2.
Punch
and score the second set of opposite sides at 3” and 3-5/8”.
Then, flip the cardstock over and only punch (not
score) at the same intervals. You really just have to look to see what you're doing. You just want them to “match up”.
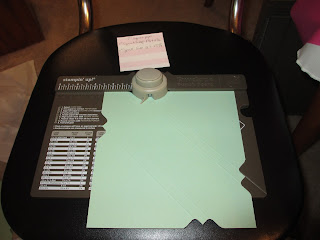
When you've finished using the envelope punch board, it should look like this:
In this picture, you can see the gum package (with the top flap cut away). It is the size of the middle rectangle.
Next, cut the jagged parts off with scissors until it looks like the picture below:
Fold your score lines, and use Tear and Tape Adhesive to Secure your side flaps (just put tape on the bottom sides below the midline-NOT on the top). Do not attach it to your gum so that you will be able to slide the gum package out. That way you can replace the gum package when it is empty.
After putting adhesive on only the bottom halves of each side flap. Fold the Bottom Flap up, then fold the right side over, and then fold the left side over taking care to "square" the corners of the box. (I had the gum package in the box at this point to assist me in achieving that.)
Cut a piece of designer series paper (Mine is 3-1/4 inches wide by 3-5/8 inches wrapping from the front over the top and to the back.) Score on horizontal at 1-1/4" and 1-3/4".
Next corner round your top flap using the top of the Envelope Punch Board. Also, corner round your designer series paper piece. Next place adhesive in the fold and along each horizontal edge of your designer series paper piece. Begin in the middle (on the top fold/edge) and adhere the dsp to the box.
Add your butterfly by using dimensionals on only the bottom two quadrants of the butterfly's wings. This allows the flap to "tuck into" the space under the butterfly. Next, I used a glue dot to adhere an In Color Blossom Accent. I added a rhinestone bling to the center of that Delightful Dijon flower and added rhinestones to the butterfly's body as well.


