Wednesday, August 5, 2009

General Swaps for Wednesday

Today's Bright swap adventures call for Kaleidoscope designer series paper. I used it to make an old-fashioned candy slider which I filled with skittles and also to create the Pony Party cards below....The ponies manes are glittery and girly! Perfect for a little girl's birthday!


Tuesday, August 4, 2009

What I'm swapping today....

Today, I am in organized swaps at convention and will be swapping with these items. First is a rectangular coaster album using the new Real Red ribbon, Merry Moments Designer Series Paper, and Christmas Punch set....I plan to show the inside pages after Convention.

Next, is this explosion card. They are so fun to make! I used the scalloped square die to create the triangle on the front bib and the mat layer inside the card. I just cut a row of scallops off each side of my original square using the Big Shot to create a smaller square....:) I also used the Greenhouse Garden Hibiscus and the On Your Birthday stamp set as well as the lattice-like perfect details Big Shot texturz plates and Big Shot Little Leaves die.

I'm so sorry the front of this card was being a poo! Here it is sideways....This is my favorite card I made this year, so I had to include the picture anyway to show the edges of the hibiscus are edged with contrasting colors of markers and to allow you to see the lovely texturz die. I am such a stamping nerd that I have a matching hibiscus shirt to wear when I swap this card! I know....what a geek!

Monday, August 3, 2009

Mojo Monday.....Stampin' Up! Convention time again!!


For the MOJO Monday challenge #98 I had a few of these Dasher emboss resist images leftover from swaps, so I decided to use it for the challenge. Sorry the picture is blurry...I leave pretty early in the morning tomorrow :)

I will be posting "What I'm swapping today" each day during convention so be sure to check back Tuesday-Saturday!

Wednesday, July 15, 2009

Emboss Resist & Serigraph Dasher


This layout is SC237 on SCS, and I used the serigraph technique I chose for the Technique Challenge on Stampin' Addicts. The colors are some I've been wanting to try with the Dasher image and the snowflakes from Christmas Punch. I then used the Merry Christmas from Teeny Tiny Wishes for a Christmas card in July.

I confess I didn't have a large size Garden Green pad to use with the brayer, so I just swiped the ink spot over the paper....It worked fairly well. :)

Tuesday, July 14, 2009

Sparkly Web


I made this card using the Sketch Challenge (SASC19) on Stampin' Addicts. It was fun to use the new Cast-a-Spell Designer Series Paper with the new Web wheel and the Eat, Drink & Be Scary set. I wheeled the Web using Black Craft ink and heat embossed with iridescent ice embossing powder on a great dizzying stripe pattern. I bet that's one happy little spider!

Thursday, July 2, 2009

Happy 4th of July and a post....


This one of the two cards we will make at my upcoming Mystery Hostess NEW IBC (idea book & catalog) Rootbeer Float party at 6:30 p.m. on Thursday July 9th.

We'll use the technique that "hooked" me on stamping, Poppin' Pastels, with two of my favorite colors (Brocade Blue and Certainly Celery) and two new In Colors (Dusty Durango and Soft Suede). If you're local, bring your friends and let me know you are coming by Monday the 6th.

Tuesday, June 30, 2009

Big Shot Technique

For the Technique Challenge on Stampin' Addicts today, I decide to create a sanded designer series paper background. I used the Pumpkin Pie semi-solid piece and the Texturz embossing plate, and then just used SU! Sanding Blocks to gently remove a bit of the color on the raised portions of the dsp.

Next, I used the background on my card with the Razzle Dazzle set and Teeny Tiny Wishes. ~Lots~ of scallops on this one, and I positioned the dimensionals only out on the scallops of the scallop square so that.......

A gift card can be slipped under the image layer and ribbon...this one doesn't match, but you can see it easily. I was inspired by SU! demonstrator Carrie Gaskin for this, but I'm not sure she'll be flattered by the reference....mine isn't as dramatic as hers :)....shown here: http://artisticavenger.wordpress.com/2009/06/25/tropical-wedding-an-artisan-award-entry/ I do intend to try her layout soon...it rocks!


Friday, June 26, 2009

Birthday in the Mountains

This card was inspired by Wendy's LSC226 on SCS, but I couldn't stick with the requirements, so I'm just posting to my blog. I just had to add the Not Quite Navy sky (since nightfall is mosquito time) and some Dazzling Diamonds, so it didn't fit the masculine requirements and only brown and green which was my goal.

Scooping success from failure (ha!), I plan to offer this card for my Birthday technique class in August. It uses masking as well as paper piecing and sponging to create a cute boy card that will be fairly quick to make. I saw putting a sign in the bear's hands on a blog or maybe from SU!...I apologize that I can't remember.


Thursday, June 25, 2009

'tis the season!?

Last night was the second meeting I've held for my downline, and it was loads of fun! It helps that one of my favorite things is chatting about Stampin' Up! :)

We held a swap also, and this is the card I chose to swap. It uses the new Level 2 Hostess Set, Christmas Punch as well as the Merry Christmas from Teeny Tiny Wishes. I think it looks cute to thread the red gingham through Frosty's hat as a hatband....It was easy to just use my papersnips to cut a little slit and thread it through. It is 92 degrees right now, so a little frosty looks inviting!

It was the season for a new look too, so I chose to pay Michelle Laycock (her graphic link is on the left hand side below) to make a new blog banner for me. She was so patient and creative! I'm so happy with her work!

Tuesday, June 23, 2009

Glittered Stained Glass

I taught this technique last Saturday at my Hostess Appreciation Brunch....It was a fun technique that I hope they will enjoy on their own as well.

I've seen this technique from several different sources and wrote instructions in the Technique Challenge thread for it on Stampin' Addicts, but the tutorial I found was by Julie Buhler.

I varied from Julie's tutorial slightly because the Crystal Effects dry pretty quickly so it is necessary to go a bit over the edge of the StazOn layer to ensure good coverage.
The card shown below shows a slightly stepped up and extra blingy version. Placing Whisper White cardstock behind the image after covering the remaining acetate with Crystal Effects and Dazzling Diamonds Glitter camouflages any streakiness or missed spots really well.


Thursday, June 18, 2009

It really IS a gatefold....

This post is just to prove this card really is a gatefold. Usually it is very obvious, because of matching bisected layers on each side of the opening, that the opening is in the middle of a gatefold card. This time I made it appear to be a regular card on the front by just layering as usual and attaching the layer only to the left side. As you can see, the back (large polka dot) of the designer series paper and the ribbon do show, but I think it is sort of pretty. I finished the inside of the card as well for an added bit of cuteness.

Saturday, June 13, 2009

Bon Voyage Blog Hop

Welcome to Port of Call #23 on Stampin' Addicts 2009 Bon Voyage Blog Hop!

Last Chance stamp sets will only be available through June 30th. If you see one you love, contact your demonstrator asap to order! The Blog Hop links will only be active through 11:59 pm Tuesday June 16; after that, many hostesses will post more details on projects you see today. Bookmark your favorite stops now--on return visits, you'll bypass customs & immigration and go straight to the fun!

Bon Voyage Pretty Amazing!

I have really enjoyed this set over the last two years, so I'm sure you will enjoy it too. For $22.95, you receive 6 stamps including the hummingbird, butterfly, mum, stem and leaves, daisies and Amazing sentiment.

First, I created a card of the Pretty Amazing images with the Bella Rose designer series paper for a sweet look. The card is a gatefold design, but I made the front into a regular layer for variety. On Tuesday, I will show you the decorated inside of the card which will let you see that there really is a gatefold underneath it all. I stamped directly on the designer series paper for the main image.
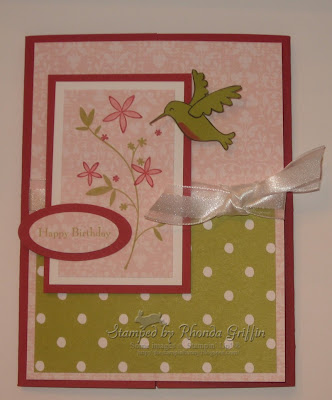

Supplies:
Card stock/Paper: Whisper White, Ridinghood Red and Bella Rose Designer Series Paper
Stamps: Pretty Amazing & Very Versatile (from 2009 Occasions Mini-also available for a limited time)
Inks: Kiwi Kiss, Ridinghood Red, Pretty in Pink Marker
Embellishments: Whisper White Organza ribbon
Tools: Small and Large Oval punches

Next up is this "Out Box" for storing cards on your desk or table until they can be addressed or mailed or both. The front is embellished with a sheet of designer series paper from the Razzleberry Lemonade designer series paper that will be available in July, and also has flowers stamped in the new Crushed Curry classic ink.

Supplies:
Card stock/Paper: Whisper White, Old Olive, Razzleberry Lemonade dsp
Stamps: Pretty Amazing
Inks: Only Orange, Old Olive, Crushed Curry
Embellishments: Dimensionals, mini glue dot
Tools: Big Shot Top Note Die

Last is a display of three cards (you could gift inside the Out Box) on which I used the Rock N Roll technique on the mum's petal edges. I also used the new in colors with the Pretty Amazing set as well as three sentiments from the upcoming Teeny Tiny Wishes Set. The set can also make lovely backgrounds with either colors or Versamark ink.

Supplies:
Card stock/Paper: Whisper White, Old Olive, Not Quite Navy, Crushed Curry, Rich Razzleberry, Melon Mambo, Dusty Durango
Stamps: Pretty Amazing, Teeny Tiny Wishes
Inks: same plus Versamark
Embellishments: Dimensionals, mini glue dots, large and small oval punches, ticket corner punch, Ice (olive) circle rhinestone brad, Old Olive 5/8" grosgrain ribbon


**********************************************
Click here to go back to Port of Call #22 with Brandi
**********************************************

***********************************************
Click here to proceed to Port of Call #24 with Comeka
***********************************************

For stamping inspiration, fun and friends join us at Stampin' Addicts.

Tuesday, June 9, 2009

New Catty Sneak Peek

Since I needed to create an emboss resist example for the technique challenge on Stampin' Addicts today, I decided to pull out the new catty sneak peek things and give them a try. (SU! states that we are able to display sneak peek items online if we wish.)

I used the Mojo Monday Sketch (MOJO90) with the new Razzle Dazzle stamp set and the new Razzleberry Lemonade designer series paper with two of the new In Colors (Rich Razzleberry and Melon Mambo). I used the new In-Color markers SU! that will be available July 1, to stamp the main image (using Old Olive and Melon Mambo) onto the Rich Razzleberry striped pattern to tie the Old Olive into the paper. I also stamped the image in versamark onto the Melon Mambo layer used Rich Razzleberry to sponge onto the edges of the both that layer and the Melon Mambo DSP layer.

The daisy and the main image were stamped in Versamark on Whisper White and clear heat embossed. I used sponges to add color and then wiped off the excess ink. I cut out the bouquet image and added it to the card. I was surprised by the versatility and ease of use of this set!

Tuesday, June 2, 2009

Last Chance List

The Last Chance stamp set list is out, so I want to announce the next blog hop June 13th-16th! You will be tempted by all the great sets that will no longer be available after June 30th. I will be creating with the lovely set, Pretty Amazing.

Monday, June 1, 2009

More is More Butterfly

The original was glittered, but still subdued. Notice the added embellishments I used to bump up (More is More) the card I posted on Friday. I added Bashful Blue in several areas....including Rock N Roll on the edges of the butterfly. The scallop strip with Bashful Blue taffeta as well as the Bashful Blue Brads and layers give the card a bit more festive look I think.

Friday, May 29, 2009

Inspired by a store-bought (gasp!) invitation

My daughter received a birthday party invitation with this layout so of course I had to try it. This uses the True Friend Stamp Set and Dazzling Diamond Dust technique....Simple and sweet....Pretty sure I'm going to use this layout again too.

(Monday's post will be a More is More re-do of this card.)

Thursday, May 28, 2009

Manhattan Tri-Fold

This is what my girls made tonight at my first downline meeting. It makes an impressive card, but is suprisingly easy. I used the Oval All set for the dot border, Very Versatile thank you, and butterfly from Great Friend all with white and Regal Rose.

My card is cut at the top at 5 inches tall after texturizing with the Big Shot. I was inspired by a beautiful card and tutorial by BJ Smith--I believe she invented this fab idea! Thanks for sharing BJ! (If only I had enough Pink Pirouette or Pretty in Pink 12X12 cardstock I would have used them!)

Saturday, May 23, 2009

Father's Day

This card uses texture plates and the spotlighting technique for an interesting masculine design. This is the latest addition to my June technique class. Consider joining us on the 4th of June!

Tuesday, May 19, 2009

Rock N Roll--Sweet N Simple

This card is for today's Technique Challenge on Stampin' Addicts. I decided to go with Rock N Roll and the Petal Pizzazz flowers and leaves. The flower is ink in Blush Blossom and then edge-rolled in Rose Red. I popped the flowers up on dimensionals (after adding the Pretties Kit Half Back Pearls to the centers) to allow the chocolate chip sentiment layer to tuck under them to close the card.

Blush Blossom card base=8-1/2X4-1/4 (score at 3)

Chocolate Chip sentiment layer=7-1/2X2-1/2 (score at 4-the 4 inch side is glued to the Blush Blossom base and the 3-1/2 inch side has the layers and is tucked under the flowers)


Friday, May 15, 2009

Peaks and Valleys Fold Card


I ~love~ this fold I found on Tonya Allen's blog. Tonya found the idea on SCS by sheltyx1. She didn't say if she invented it or not. It looks difficult but is surprisingly easy to create. Tonya created a nice tutorial if I don't answer all your questions....my version is:
  • Cut a 5-1/2 X 12 inch piece of cardstock.
  • Score vertically at 2, 4, 8 and 10.
  • Cut horizontally 1-1/2 inches from the top and bottom edge from the 2 inch score line to the 10 inche score line.
  • The top and bottom rows should be folded Peak, Valley, Peak, Valley.
  • The middle row is creased Valley, Peak, Valley, Peak (Don't use the bone folder on this one as each fold isn't used).
  • The middle row is covered by the 2-1/4 X 3-1/4 inch image mats (shown in polka dot on my example).
  • Embellish as desired :)
I changed the height of the card also....My card is only 5-1/2 inches high, so that it will fit in a medium SU! envelope. That makes the center portion only 2-1/2 inches high rather than 3 inches, but it was still easy enough to use this way.

I used the Parisian Breeze Designer Series Paper and the coordinating Dreams du Jour stamp set. I also used JanTInk's ruffled scalloped edge around the 1-3/4 inch circle punch Old Olive mat layer. Butterflies, Kraft Taffeta ribbon and a flower and half back pearl from the pretties kit add interest, hopefully without competing with the lovely paper patterns.
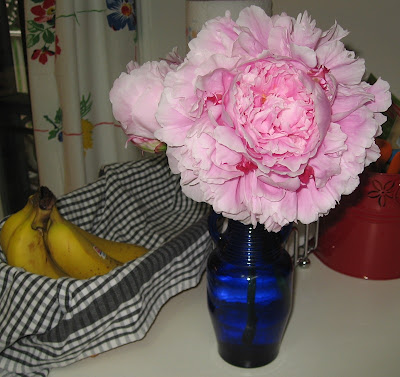
Just for fun.....I had to cut this peony from my garden because the stem fell over...I had to share even with the bananas in the background LOL.

Can you find the bunny in this picture of my climbing roses? The hot pink one is about finished blooming, and the light pink 'New Dawn' is just getting started.