Thursday, May 27, 2010

Stampin' Up! some Fairies!

The A Little Big of Magic set will make adorable cards for little girls--My first card is really simple and includes Paper Tole just for the wings.  I stamped in Vellum, colored them pink, added glitter and attached them to the fairy's back with mini glue dot bits.


Hopefully, you can see the wings better since I tilted the angle of this picture?


Tuesday, May 25, 2010

Paper Tole

Today I used the MOJO140 sketch for this card using retiring cardstocks and paper tole. I used Stampin' Up!'s Asian Artistry hostess set and the hostess paper pack in Ruby Red and Mellow Moss with it as well.

Paper Tole is today's technique challenge on Stampin' Addicts...I find it pretty easy to cut out some portions (I used different colors on some petals) and pop them up on dimensionals or half of a dimensional. Perhaps it is easier to see in the second picture.  I hope you'll try this technique and upload to Stampin' Addicts.  I'll have another example of Paper Tole tomorrow.


Saturday, May 15, 2010

Motorcycle Journey

Okay, the men (or women :) ) closest to me don't ride motorcycles, so I didn't ~need~ this stamp from Stampin' Up!'s new Summer Mini catalog, but it seems so practical for masculine birthdays and events.  I obviously talked myself into it, and since it was only $8.95, I was easily swayed.  The sentiment from the Pedaling Past set, "Enjoy the journey!" makes this an "anytime" card.

I used SASC52 on Stampin' Addicts for the sketch for this card, and I was inspired by this Graduation Card by Kay Kaltoff for the awesome use of SU!'s new Square Lattice Embossing Folder. This card could be made in a variety of colors and is quick and easy!

Wednesday, May 12, 2010

Dog Sorry and Congrats! cards

When the cat and dog sets were Sale-A-Bration choices this year, I was so pleased.  Occasionally I do need to send dog or cat sympathy cards to friends, so I promptly chose those sets for free.

I made several of the dog sympathy cards...I find that having a good stock of a card usually prevents me needing to use it, so I'm protecting my friends' pets by making these-LOL! 

I also made a Congratulations on your new dog card with last week's MOJO Monday sketch (MOJO137).  I think this sketch made the card SO much nicer than I would have imagined on my own.


I also had to share these pretzel butterfly cupcakes.  I found them elsewhere, but they credited the Martha Stewart website.  Sara will enjoy taking these to her end of year dance class party today, and they were very stress-free even with Sara helping a bit.


Wednesday, May 5, 2010

Easy card with Watercolor Trio

This is of the cards for Chicks and Chocolates Quick and Easy cards which will be on the 20th of this month at 9:30 a.m. or 6:30 p.m.  I love Stampin' Up!'s new Watercolor Trio set! It is versatile, includes three sentiments and looks nice with these soft colors and other retiring colors as well. Get the retiring colors while supplies last.


Monday, May 3, 2010

Island Oasis Drink Umbrellas Tutorial


These umbrellas are easy, but do take a little time.  I think you'll enjoy how easy they really are. If it seems confusing, it is probably the fault of my instructions. Maybe having a Scalloped Die Cut on hand while you're reading would make it pretty easy to imagine?

What do you need?

Sticky Strip
Designer Series Paper and or cardstock
Bamboo Skewers
Scoring Tool
Big Shot Bigz Scalloped Circle Die

Scalloped One-Layer Umbrella

The first step is to score the Stampin' Up! Bigz Scalloped Circle every 4 scallops at the low point (meaning in the trough-not at the curve/peak of the scallop) in half evenly from top to bottom (or bottom to top-your call) At the end you will be left with only three scallops rather than four.

At the peak/curve of the middle of the three scallops, score again in the vertical direction. We'll call this the ~fold~ score. You can see this step in Tempting Turquoise below.  Now just bump fold all the regular scores up and fold the ~fold~ score down.


Next, add sticky strip to the inside of the valley/trough as shown below.


Next, remove the red backing and create the flaps shown below. This is a view of the bottom of your umbrella:


To complete the umbrella, just use sticky strip to lay the fold down flat.  This is the simplest way to make an umbrella. At this point, just poke a bamboo skewer into the point at the top and secure at the top or bottom with a mini glue dot.  I cut my bamboo skewers shorter (I cut the flat end not the point.) using very sharp kitchen shears so that they would be at the right point at the top of the glass.

Removing the Scalloped Edge

To create a smaller or more masculine umbrella, it is pretty simple to cut off the scalloped edges.  You proceed with the scoring as you did for the first umbrella, but don't use sticky strip yet. Line up the scored lines on your paper cutter and remove the four scallops as shown below.  You do this the same way for the spot at which there is only three scallops too.
Next, fold the umbrella as you did the first one and follow the previous steps using Sticky Strip to adhere the flap down.  Notice below that there is a bit of the underside showing.


I just sheared that off with paper snips.

It is so simple to just place the umbrella without scallops onto the scalloped umbrella for the fancy version. :)  At that point you just poke a bamboo skewer through each piece carefully and add a glue dot on each side (top and bottom) of the stick.  You may want to adhere the umbrella layers together as well. I added a tiny flower on top for added decoration, but it isn't necessary. 

I'd love to see your umbrellas if you make some, so feel free to leave a comment with a link to your blog or gallery post.  Have fun!


Friday, April 30, 2010

Stampin' Addicts Summer Mini Blog Hop Tropical Party

Welcome to the Stampin Addicts Summer Mini Blog Tour! Join us on Stampin' Addicts for Stampin' Up! samples, discussions, information and of course FUN!  You may have arrived from Heather's blog featuring her cute projects with the First Day stamp set. If not, the tour is circular. You'll get there eventually if you click at the end of each blog hop post. If you somehow get lost along the way, just click HERE and there is a list of the blog hop sites, in order.

The new Summer Mini from Stampin' Up! is available for ordering from  May 1 through August 31, and as usual Stampin' Up! demonstrators were allowed to order ahead so that we can showcase these fun sets.  One of the great sets I chose to preorder was Tropical Party. I added the Island Floral Bigz Big Shot Die and the Island Oasis Designer Series Paper as well, so today I have a few little projects to share.

First up are these Drink Umbrellas that were so easy to make using the Scalloped Circle Big Shot Die and the fresh and fun Island Oasis Designer Series Paper.  I'll have a tutorial (with  step by step pictures) for you back here on my blog on Monday, so check back if you're interested!

You'll notice you can make them more masculine by cutting of the scallops and keeping the top of the skewer free of a flower (Pumpkin Pie floral), keep them simple with just a scalloped Designer Series Paper umbrella and trio flower punch on top (Rose Red floral) or layer a cut layer over a scalloped layer. I embellished the So Saffron umbrella with the small flower from the Island Floral Bigz Die and a rhinestone brad.


I created a super casual outdoor Luau set with the Bigz Die and Designer Series Paper as well.  A Fancy Favor Big Shot Die box created a holder for the plastic silverware with the large flower layered on the bold and flowery Island Oasis DSP.  Coordinating patterns for the umbrella, straw flower embellishment and placemat would make each guest feel so special, and the napkin ring completes the display. 


Oh, you don't typically make placemats for your outdoor entertaining? I admit I don't either, so I converted the placemat into a Scrapbook Layout for our trip to Hawaii....that was almost four years ago!

Now I feel like a genius rather than a four-year-slacker because this new paper is perfect for tropical pictures! :) Strangely, most of my pictures are landscape, and I didn't want to lose the scenery/cut them very much.  I balanced the horizontal with vertical lines and am happy with the result. Tons of pictures on one layout....yes, I do that sometimes.


Enjoy more of the islands on this Tea-Stained card. I even used a color that will be returning for next year...My Favorite-Baja Breeze! The white gel pen is easy to use to make the coconut really stand out against the background.


Continue your Summer Tour with a stop at Holly's Blog for her creative Christmas interpretations of the Island Floral Bigz Die. Thanks for touring with Stampin' Addicts!

Wednesday, April 28, 2010

Color Renovation Inspiration Western Get Well

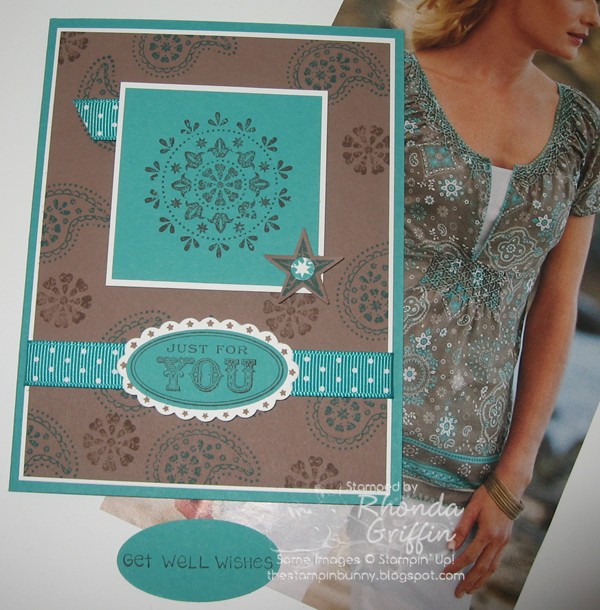
With the Color Renovation from Stampin' Up! visible on the horizon, I've created several cards that use retiring/"get it while you can" cardstock. This sample using Bermuda Bay and Close to Cocoa (both retiring colors) was so easy once I saw the pictured shirt in a catalog.  The funny thing is that the ladies' shirt seems to have inspired a masculine card. :)

Be sure to email me if you'd like to place an order because once June 1 arrives the accessories such as ribbon and brads (and for this year this includes retiring colors of cardstock too!) that are retiring may go out of stock and become completely unavailable.

The card below features Close to Cocoa again, this time with Pink Passion, Gable Green and Pixie Pink.  It also uses the MojoMonday sketch135 (though I altered the size a bit).


This simple card is so Spring-y!  Brocade Blue, Barely Banana and Gable Green make a cheery daisy card inspired by the rug below it.

Be sure to check back on Friday for the Stampin' Addicts Blog Tour/Hop!  I've created several things using the new Tropical Party Stamp set, Island Floral Bigz Die and Island Oasis Designer Series Paper, and there are 22 other stops by which you can be inspired.


Wednesday, April 21, 2010

Color Renovation Inspiration

For Quick Chicks and Chocolate classes during Stampin' Up!'s Color Renovation, I am tailoring my cards to highlight many of the retiring colors. (In July, I will focus on the new colors.) This card was inspired by colors from the dotted towel picture on which it is resting.  It uses a combination of the new Tropical Party Set and the Flight of the Butterfly Set.  The colors in this card (other than Whisper White) are retiring, including Gable Green, Brocade Blue and Brilliant Blue.


The colors shown on the card below (inspired by an orange a pink version of the same towel) are also retiring.  Those colors are Pixie Pink, Only Orange and Pink Passion.


Friday, April 16, 2010

Summer Mini Preview Card Builder Wheels Birthday

Today's Masculine Birthday card is SO simple!  I used Stampin' Up!'s new Builder Wheels with the Triple Cell Cartridge (inked with Not Quite Navy, Old Olive and Rich Razzleberry) to make this masculine yet glitzy card.  I rolled it onto an 8-1/2 inch wide piece of Whisper White then cut it down to 5-1/4 wide by 4 high after wheeling.  Then, I used the Gold Glow Smooch Spritz to give it some sprinkles of gold shine. 


Here's an easy tip: I also glittered the ribbon using a large shoebox (though Stampin' Up! has a great Color Catcher too) with a piece of Stick Strip at the top to hold the ribbon. You have to hold the Spritz Spray upright so the ribbon couldn't just be put down on a table to spray it.


Stampin' Addicts is having another fun blog hop on April 30 to showcase the new Summer Mini catalog...join us back here on April 30th to click through and see 25 stampers' best projects!


Monday, April 12, 2010

Recipe Monday #26 Roasted Chicken with Herbs and Honey and May Stamp Camp

Greg altered a recipe he found on America's Test Kitchens for supper yesterday.  I think it is the best thing he's ever made!  We aren't Herbs de Provence fans (lavender in food?), so he substituted only some of the spices for that.

Salt and Pepper (or use your favorite chicken spices that aren't a particular type of cuisine) four Chicken Breasts and heat one Tablespoon of oil in a skillet (we use a dutch oven to reduce splatter) until hot and steamy.  Cook on one side for 5 minutes at medium high, then reduce heat to medium, add lid and cook for 15 more minutes. (Should reach 160F on a meat thermometer)

Remove all but one table spoon of fat from the pan and add 1/2 cup of low sodium chicken broth (box or can okay), 2 Tablespoons of honey, and nice sprinkles of Rosemary, Marjoram, and Fennel. Remove from stove and whisk in 4 Tablespoons of butter and 2 teaspoons of white wine vinegar. We use this as a dipping sauce for the chicken and serve in individual containers.  Now after all this French cooking, you'll need to go for a walk to burn off the calories! :)

May Stamp Camp Creations

I'm sure you recognize Jackie Topa's Stationery Box. I haven't made these with my stampers until now, and I really hope they enjoy them!


We'll also make this Origami Box, but I'm not sure who to credit for the design...sorry.
You may or may not wish to gift the lemon-tea salt scrub inside the box...it only fits with the lid open...:)


Saturday, April 10, 2010

More Retiring Color Information...and Bleaching Technique

New color kits will be available beginning July 1 for one year only. For example, if you have the pastels and want to change them out for the new Color Collections, a kit will be available with a new case, new insert, and just the pastels in the new colors. You would move the carry over colors to the new case. Similar kits will be available for the markers, water color crayons, ink pads and cardstock.

Full size CRAFT ink pads will be retiring with the exception of black, white, and vanilla. Craft ink will be available in spots and reinkers only after July 1. SU! will carry blank craft ink pads if you want to create a full size craft ink pad.

The Blush Blossom marker will be available in the next catalog

Retiring color items will be stocked through the end of May. On June 1, the retiring list will be published and it will become the usual free for all. Once it's gone, it's gone.


Sorry I've been busy this week!  If you're inspired to try bleaching, please stop by and upload your card at Stampin' Addicts.  It is Technique Challenge 49. (Tech49)

Here's my latest Technique mini tutorial which actually includes 2 types of bleach stamping: bleach stamping or bleach highlighting.  Be sure to use a good apron over an old shirt, work over a tile rather than carpeted floor, and be super careful.

Bleach Stamping

1. Put a full size paper towel (folded in half and then in half again) in a disposable square plastic container (Gladware type)
2. Add a bit of water to keep the paper towel in place (it dilutes the bleach just a bit too)
3. Pour in only enough bleach to wet the paper towel
4. Use the paper towel as your ink pad and stamp onto colored cardstock.
5. Your heat tool can be used to speed the drying process.
6. Dispose of bleach safely so that it doesn't spill and make a mess.

Shown on the background image below:

Bleach Highlighting

1. Stamp your image with versamark or craft ink
2. Cover with Clear Embossing Powder
3. Heat Emboss
4. Put a bit of bleach into a small cup and use a brush or Q-tip to highlight an area that would look nice lightened or white.

Shown on the surfer image below:

Wednesday, April 7, 2010

Colors...get 'em while they're hot!

Stampin’ Up! announced some amazing changes to the color lines this week!

They are now called Color Collections instead of Families and have been rearranged for ease of selection as Brights, Neutrals, Regals and Subtles. We were allowed to share with our customers so that you may plan your purchase decisions based on this new information. The new (or old In Colors) will be available for customers beginning July 1, and the current (but soon to be retired colors) will be available for purchase until June 30th.

Some Stampin' Up! colors are retiring that I will miss such as Brocade Blue and Creamy Caramel, so if you would like to order any of these 30 pretty colors in cardstock, ink pads or refills, you’ll need to do so before June 30, 2010.  A complete list is shown in the picture below.


Several In Colors from the last couple of years have returned, including my all-time favorite, Baja Breeze! (Also returning are Wild Wasabi, Pink Pirouette, Pacific Point, Riding Hood Red, River Rock and Tangerine Tango.)

Three of this year’s In Color favorites are not going to retire and will be available for purchase into next year: Rich Razzleberry, Melon Mambo and Soft Suede. Kraft has been renamed as Crumb Cake….yum!, but that doesn’t help my diet at all!

Below is a chart of remaining colors that includes the five new Core colors (Daffodil Delight, Early Espresso, Cajun Craze, Cherry Cobbler and Marina Mist) Click on and print the pictures to pick out your new favorites for July 1st while you make plans to re-stock your retiring favorites before June 30th. Five other new In Colors will be available in July that will now last 2 years instead of just one, and they sound lovely!

I hope you are as excited to try Cherry Cobbler and Early Espresso as I am, and I don’t even drink coffee.