Pages
▼
Monday, May 30, 2011
We also signed a couple of Thank You cards....
I made a few cards for those who participated in the card making to sign (and forged a couple of names we forgot to ask to sign--Kris Kilkenny :) ) as Thank Yous for the troops. We thought they could put one on the bulletin board occasionally. I think this is a perfect Oklahoma Thank You.


Saturday, May 28, 2011
Cards for the Troops...
Recently, customers and friends helped my downline, Candi create cards for the troops. Her husband is deploying, and we made what we hope is plenty of cards for them to send back to their families while they are there. They are only going for about 6 months, so there was no way they'd be able to get cards from Operation Write Home (there is a waiting list).
I think this card is cute for an airman to send to his wife, girlfriend or child depending on his sense of humor. :) The inside says "wish it were sooner"....I just printed it out on Whisper White, punched it with the modern label punch and adhered it to the inside.

I think this card is cute for an airman to send to his wife, girlfriend or child depending on his sense of humor. :) The inside says "wish it were sooner"....I just printed it out on Whisper White, punched it with the modern label punch and adhered it to the inside.

Saturday, May 14, 2011
A KickStand Card
These were popular a couple years ago, so I thought I'd show one with a recent stamp set. I tried to go simple with the rest of the card so that the main image could shine.

Tuesday, May 3, 2011
Nailpolish Holder Tutorial
This is a really simple nail polish holder...I hope you all aren't disappointed!
Cut your cardstock 8 inches by 6 inches....Score the 6 inch side at 1-1/2 inches and 4-1/2 inches. Score the 8 inch side only up the the 1-1/2 inch and 4-1/2 inch scores at 1-1/2, 3 and 4-1/2 inches. Cut only up to the score lines at these same lines. Cut the top part that is above the 4-1/2 inch scores completely off as shown below.
Corner round the top and add any decorative dsp or stamping to the project. Next add sticky strip to the lower two squares for assembly as shown below. I think it is probably sturdier to leave all three of the edge boxes attached, but you might need to make the top edge even with your paper snips if they aren't even.
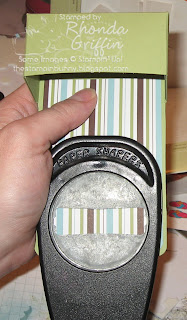
Make marks for centering your modern label punch left to right for the handle. I put it about 2/3 of an inch from the top of the cardstock.
Punch your modern label punch.
Here it is in a planning stage so that you can see the edges.
Complete decorating the toenail polish holder.
Here's a link to an updated version with a VIDEO made in 2018: Beachy Nail Polish Holder


